
Win Your Warmup
We’ve all seen that one guy or girl that sits around doing nothing before getting dressed and hitting the ice. While you might be able to get away with that, as you get older this will make playing the sport increasingly difficult, as well as minimizing the benefit you’re getting on the ice regardless of your age or level.
A proper warmup’s list of benefits is impressive:
· Chronically improves range of motion by microdosing exposures to larger ranges of motion.
· Acutely improves range of motion by increasing body temperature, which improves tissue extensibility.
· Decreases viscosity of synovial fluid, allowing your joints to move more freely.
· Increases nervous system conductivity, making your muscle activate faster, with more force (which is why breaking a sweat is so important).
· Releases epinephrine and norepinephrine, increasing alertness and wakefulness.
Some players might think that a warmup is overrated because they can just use the first few minutes of practice or the first few sets of an exercise to warmup. Although this might be the most “specific” type of warmup, it’s also taking away valuable time away from your development.
By using the first one to two drills as a warmup at practice, you won’t be able to move your body in ranges of motion or at speeds that you’ll see during the game. You also won’t be able to read plays or handle the puck as quickly because your brain hasn’t had an increase in blood flow yet. You want to practice the way you play, and if you take the first 10-minutes of a 60-minute practice, you’re missing out on 17% of practice to improve.
The average individual puck possession time in a 60-minute game is less than 1-minute. This makes practices invaluable in honing your skills. So, if you’re missing out on 17% of that time just to warmup, you’re leaving a large chunk of skill development on the table.
In the gym, if you use the first one to two sets to warm up, you’re also missing out on off-ice development opportunities. For many training sessions, you may only perform two or three sets of an exercise. Even in the best scenario, you’d still be missing out on 33% of improving your strength, power, or speed.
From injury prevention, to performance, and development, including a warmup into your preparation process is a no brainer. Some of the most common mistakes I see athletes making is having their warmup be too short, too long, too general, or too easy. Every warmup should follow this step-by-step process:
1. Get Mobile
2. Get Stable
3. Get Warm
4. Get Ramped Up
The first two steps in this process can be encompassed by the Joint-by-Joint Approach that was popularized by world-renowned physical therapist, Gray Cook. The Joint-by-Joint Approach speaks to the body’s organization of alternating joints that are predominantly meant for mobility or stability.
To be clear, every joint in your body needs mobility AND stability, but certain joints are meant to move more freely, while other joints are meant to have limited motion.
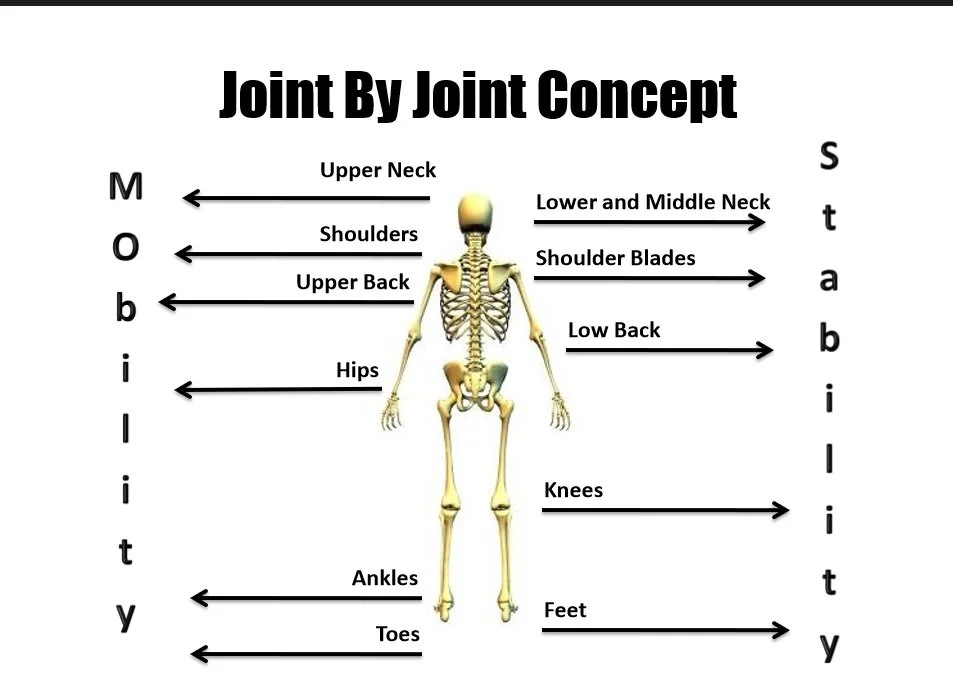
Looking from the ground up…
Toes – Mobile
Foot – Stable
Ankle – Mobile
Knee – Stable
Hip – Mobile
Lumbar Spine (lower back) – Stable
Thoracic Spine (mid-back) – Mobile
Scapula (shoulder blade) – Stable
Glenohumeral Joint – Mobile
Elbow – Stable
Wrist – Mobile
Hand – Stable
Fingers – Mobile
Lower Cervical Spine (neck) – Stable
Upper Cervical Spine – Mobile
When looking at this, some people get confused about joints like a knee or an elbow being classified as a “stable” joint. It’s clear that these hinge joints need to have proper range of motion in their single plane of movement, but you don’t want a lot of movement laterally or rotationally because that would put undue stress on the supporting structures.
As I’ve talked about in previous posts, the skating stride requires a ton of motion across multiple joints. In a linear stride you need ankle dorsiflexion, hip flexion, and hip internal rotation on the stance leg as well as ankle plantar flexion, hip extension, hip abduction, and hip external rotation on your stride leg. During a crossover stride you also need hip adduction and internal rotation on your stance and stride leg. Not to mention there is thoracic rotation and shoulder extension to keep you over your stance leg during both patterns.


Take 3-5-minutes to address these ranges of motion in your Get Mobile section of your warmup. A simple way to organize your warmups is to have one day that aims to improve ankle dorsiflexion, hip extension (quad biased), hip adduction, hip abduction, thoracic rotation, and pec extensibility and another day that aims to improve ankle plantar flexion, hip extension (hip flexor biased), hip internal rotation, hip external rotation, thoracic rotation, and lat extensibility.
This would look something like this:
Day 1:
Wall Ankle Mobility: 8/side
½ Kneel Quad Mobility: 8/side
Lateral Kneeling Adductor w/ ER: 8/side
Quadruped Posterior Hip Mobility: 8/side
Quadruped T-Spine Rotation: 8/side
Wall Pec Mob: 8/side
Day 2:
Seated Anterior Ankle Stretch: 30s
Alt. Spiderman Mobility: 8/side
Lying Alt. Knee to Knee: 8/side
Seated 90-90 ER: 8/side
Side Lying Windmill: 8/side
Lat Hang: 5 breaths
Being restricted in one area that’s meant to be mobile can cause a compensation with a joint above or below that’s meant to be stable. An example of this can be a player with restricted hip internal rotation trying to perform a crossover, hitting a wall, and continuing the motion by opening at their knee or rotating excessively at their lumbar spine. And in the best-case scenario where no compensation happens, this player’s crossover will be so restricted that they will get beat by their opponents constantly due to their short, choppy strides.
Opening range of motion is only one side of the equation though, as you should be performing stability movements to “lock in” the range of motion and restrict the motion of unwanted joints by activating the surrounding musculature.
Stability in the knee is created by activation in the glutes and hamstrings. This can be done through hip lifts, adductor squeezes, or lateral hip movements will mini bands. Stability in the lumbar spine is created by core activation. Use plank, side plank, and anti-rotation press variations. Scapula stability is created by activation in the low trap, rotator cuff, and serratus anterior. Using Y, T, W raises, external rotations, or wall slide variations gets the job done here.
Spend 3-5-minutes performing 1-2 sets of movements for the knee (with hip activation), lumbar spine (with core activation), and scapula for your Get Stable section of your warmup. This can look something like this:
Day 1:
A1. 2-Leg Hip Lift w/ Squeeze: 2x8
A2. Stability Ball Rollout: 2x8
A3. Serratus Wall Slide: 2x5 breaths
Day 2:
A1. Alt. Mini-Band Elvis: 2x8/side
A2. Side Plank w/ Hip Tap: 2x8/side
A3. Seated DB External Rotation: 2x8/side
The next step of the process is to get warm. Obviously, you can choose to ride the bike, jog, or jump rope, but the better option will be to perform a dynamic warmup so that you can move through different patterns that your body could be exposed to on the ice. As a rule of thumb, you should do 2-4 linear patterns, 2-4 lateral patterns, and 2-4 multidirectional patterns across 10-20-yards each. This can look something like this:
Butt Kicks: 20-yards
High Knees: 20-yards
Linear Skip: 20-yards
Lateral Skip: 10-yards/side
Shuffle w/ Arm Swing: 10-yards/side
Carioca: 10-yards/side
Alt. Diagonal Bound 3x to Build Up: 20-yards/side
Back Facing Hip Turn 3x to Build Up: 20-yards/side
You can really use your imagination here. The game of hockey is very unpredictable and you’re rarely sprinting from a dead stop. Performing different backpedal, shuffle, crossover, and bound variations exposes your body to different patterns so you can be comfortable accelerating on the ice regardless of the position you find yourself in. This Get Warm section of your warmup should take 3-5-minutes.
The last section of the warmup, Get Ramped Up, is the most overlooked. While getting your body warm, heart rate up, and body sweating puts you in a positive direction for nervous system conductivity, you want to make sure the nervous system is ramped up so when you hit the ice, you can hit high speeds immediately.
Your body will resort to using slow twitch fibers before using fast twitch fibers in an effort to conserve the fast twitch fibers for high force or high speed movements because they are easily fatigued. By performing line hops, sprints, jumps, or medball throws, you are bypassing the body’s mechanism to default to the slow twitch fibers by creating a short-term excitement in the fast twitch fibers. This is known as post-activation potentiation (PAP).
Take 1-2 minutes after your dynamic warmup to run through these movements so you step on the ice with your nervous system connections firing as efficiently as possible.
Following this blueprint and taking 10-17-minutes of time before your practice, game, or training session give you all that additional time to develop and perform at your highest level. If you’re a younger player, you can spend your time on the lower side of that range, while older players should be on the higher side of that range. These small wins in your warmup will compound over time and allow you to win in the gym, win on the ice, and win at life.